Showing posts with label Made From Scratch. Show all posts

Tuesday, January 21, 2014

A Tutu Fit For A Rockstar


Sometime last year, I took on a fun project-- design and sew a tutu for a bride-to-be's hen's night. The challenge: the bride is not a girly-girl type of uh, girl, so Kel Li the maid of honor wanted something feminine yet edgy for the bride. We discussed it and decided on a combo of soft tulle, pleather and studs: the ultimate hard and soft (hello Project Runway episode title!).

And of course, the tutu had to be in black ;-)

Here are the initial sketches:


While both are rock star-worthy, the tiered tutu was a little more playful while the single layer tutu was more... grown up. Kinda like Avril Lavigne vs Gwen Stefani, y'know what I mean? Kel Li decided the single layer was more becoming of Joanna (the bride), so we went with that.


Kel Li said the tutu has to be poofy, so a lot of ruffles went into it. I actually laughed when I was sewing them because the ruffles seemed never ending and I was surrounded by it!


And all the ruffles, ruffles and ruffles were worth it.. the hemline of the lining was so flouncy and pretty-- time to look for a subway grate ala Marilyn Monroe maybe?


And all that flounce, topped with layers of soft black tulle...


Gold studs on the waistband for that rock star edge. My favorite part though, was the tiny little widdle rhinestones.

Tutu: Unfluffed. Oh she's a rocker chick.

I didn't want to overdo the bling-ness of the skirt, but wanted the tutu to sparkle with a bit of dreaminess. So the tiny rhinestones dotted the tutu like stars in the dark sky.

And when the tulle is fluffed up by hand, that's when things begin to get dramatic.

Tutu: FLUFFED! DRAMA MAMA! SHE'S GOING TO SMASH HER GUITAR!! MASCARA EVERYWHERE!!

But don't take my word for it-- let the bride speak for herself:

Pic by Kel Li

Uh sorry she can't speak now, she's kinda... occupied. 
Hahahaha I love that bathtub pic, Joanna really rocked it!! Pretty epic.

Pic by Kel Li


I know this is super late, but congratulations again to Joanna the rock star bride! And thank you Kel Li & Nora for the fun project, and for the pics! ^.^


Tuesday, July 2, 2013

Free Pattern: Sweet Nana Pajamas!


Hey guys, I'm back! Apologies for being away, it's been too long, and hopefully this makes up for it. My grandmother spent a week at the hospital for an operation, and was just discharged yesterday. My mom asked me if I could get some material to make my grandma some pajamas to wear at home once she gets discharged-- her current pajamas was too short on the legs and too tight on the waistband, and the sleeves of the blouse was too long. 


Since my grandmother spent a few days floating in and out of sleep at the hospital while the anaesthetic wore off while being in pain from the surgery scars, we couldn't really take her measurements so we decided to base the pattern off one of her pajama sets.


The sleeve was drafted using Winifred Aldrich's book (bless her)-- I tried googling for a shortcut easy way to draft sleeves (haha lazy me) and found this video by Fettucinnetube, but after drafting it and showing it to my mom, she said it looked weird and I had to agree. If anyone's tried the Fettucinnetube technique, let me know if it worked for you. I ended up drafting the sleeve the correct way with the Aldrich book and am glad I did it coz the fit is nice!


I drew the pattern in Illustrator and was in such a hurry to finish it because my grandmother was discharged a day earlier than we anticipated. Sooo the pattern isn't perfect by industry standards (you will have to have experience in sewing pattern pieces together), but hopefully it will make sense and be of help to anyone who is looking for some pajamas to lounge around in.


After sewing it, I shortened the sleeves by 9cm from the hem (the pattern's sleeves would sit at the elbow-- an oversight of mine during the drafting process as I had forgotten that my grandmother wanted shorter sleeves, oops). 


It's made for size XL, and I would recommend lightweight fabrics such as cotton, rayon, satin, polyester, as long as they feel good against your skin (a good excuse to play with the fabric like a cat at the fabric store).


The pattern is available for free as a print at home copy. The top/blouse prints on 30 pages, and the pants pattern prints on 20 pages. 1cm seam allowance (SA) is included, and there are guides to help you line up the pages to stick them together. More instructions on the pattern pdfs.

I sewed a little satin ribbon on the front of the pants as a reminder of which way's the front. Though, technically, since the crotch curve of this pants is pretty low (nobody should wear tight crotched pants as pajamas, please just don't), the pants can be worn either way.

Download the PDF patterns here:
Sweet Nana Pajamas (Top)
Sweet Nana Pajamas (Pants)

Feel free to use it to sew a loved one some pajamas! This is my first pattern that I'm sharing here, so please share it and let me know if you like it. If you have any questions, do leave a comment or tweet to me at @chiiiiing (5 i's). Enjoyyyy! :D


Sunday, January 27, 2013

Draped lycra slip and tips on getting a dress form

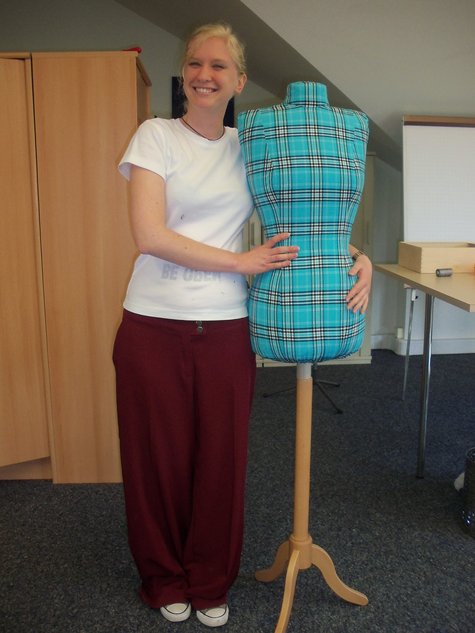
Sometime last year, I finally decided to get myself a dress form, and got mine from Leichio in Thailand. I posted this pic below on the day I received the package, and christened her Sha Nay Nay thanks to one of my Youtube favorites: Top 60 Ghetto Black Names

Yeah, I was so happy I felt like hugging her to sleep!

For my first ever project with Sha Nay Nay, I made a Lycra slip to wear under my dresses. The fabric is soft, so I can also wear it as a long tank top on its own.


Check out my boobies.


Just kidding, they're Sha Nay Nay's! Heh. Now stop checking out her cleavage! :P


This slip was fully draped on Sha Nay Nay, so no paper pattern pieces. I learned some pros and cons, which I'll get to below.


The edges were finished with small zig zag stitches, as I didn't want anything too bulky.


Here you can see one of Sha Nay Nay's adjustable dials, just like a cyborg eh?


Having a dress form has really helped me in my sewing adventures. It cuts down fitting time, and I'm able to create patterns from draping directly onto the form, like I did on the wedding dress. Here are some tips for getting your own dress form.


Tips on buying/making dress forms

If you sew for yourself and others...
1. Consider getting an adjustable dress form that falls within your measurements. Amazon sometimes has discounts-- while searching I found that the common size was M, and they were cheaper than the other sizes.
2. Check if the tailor form is pin-able. A pin-able form is needed for draping designs (some pin all the way into the body, and some pin halfway meaning you will have to angle the pin at a slant to push it in)


If you only sew for yourself...
1. Measure your body measurements (key areas: bust, waist, hips) and try to look for one closest to your size. It may be easier to buy a slightly smaller one and pad it up later to match your measurements, rather than buying a bigger one which might not help much with your fitting.
2. It won't be essential to have an adjustable dress form, so you get to save some money there :)
3. Like the above, check if the tailor form is pin-able.
4. Make your own! Here are a few ideas:


Shannon's duct tape dress form, made mostly on her own with the help of her adorable son. The thing I like about her version is that she filled the insides with spray foam.


Threads' mama got swag paper tape dress form


Sartorial DIY's amazing plaster bandages dress form. One word: WOAH!!


lazylinchen's sloper dress form filled with sawdust... another of my favorites!
Do you have a dress form, and if not would you be interested to make one on your own?

Monday, November 5, 2012

Mad Men-ners Wiggle Dress

I'll be damned if I am in the advertising industry and never went to a Mad Men theme party. Thankfully, our friend Theo (who is a writer in an agency) and his now-missus Lisa planned a Mad Men wedding dinner, so phew, I won't be damned.

Ah, Mad Men. The fashionable show set in the 60s about an ad agency on Madison Avenue. Gorgeous vintage dresses and curvaceous ladies (or should I say, curvaceous Joan) paired with dapper men in even more dapper suits, PLUS it's about the ad industry. With both my husband and I working in the industry (my husband's a writer, and I consult for an audio production house for tv commercials), naturally we were excited about Mad Men when Season 1 came out. Then er, we kinda got bored. I think it's like doctors watching Grey's Anatomy... hehehehh

ANYHOOT.

I decided I wanted to make a dress for the Mad Men wedding dinner, and I decided to make one of the dresses that the Asian girl wore in one of the episodes of Season 4. You know which Asian girl I'm talking about right? I forget her name... she's the new intern on the show. But seriously-- she's the only Asian in the show, you can't miss her. Wait, what? You don't recall there being an Asian girl on the show? Good gracious, I can't even... gosh. OK, fine, I will google her picture and paste it here, maybe it'll jog your memory. 

Here you go, thank me later:


That's the Asian intern, beside Joan!

You remember her, right?

She's the intern who ALWAYS makes mistakes, remember? The klutzy Asian intern?

No? Maybe you'll remember this promotional poster instead:


Remember her now????

. . . . 

. . .

. .

. . . ok, ok, fine, yeah, that's me.

LOL.

(Love the looks on John Sterling and Don Draper's faces thinking about this crazy Asian intern.)

I drafted this dress, inspired by Butterick 6582 for the bodice.


The fabric is a faux houndstooth/plaid-with-a-houndstooth-mirage that I bought from Singapore when Ayu took me to the fabric market. I had initially bought it to make shorts, but after having drafted the dress I thought hey hey hey!! This would look fab too!


I love it that I had shoes that miraculously goes together with the whole look. Belt from Bangkok, and a vintage brooch that belonged to my husband's late mother.


For the back of the dress I drafted a deep-V (no place for a bra; thank goodness for sew-in bra cups [edit: here's how I did it] ) and a kick pleat for the wiggle skirt. The skirt length hits just below the knee like the sophisticated dresses in the 1960s (I think it also enhances the wiggle shape).

The dress is fully lined-- my first fully lined dress!-- and I love wearing it. It gives the dress a better hold (especially when the main fabric is not as structured), and I don't have to worry about having to wear a slip/whether my slip is showing. I think I really like deep-V backs, and would like to draft more dresses like that. 

Here's a photo of us at the dinner being irresponsible adults:

Tsk tsk tsk...


What about you, have you made a Mad Men inspired dress before? I love the fashion sensibilities of that era, don't you? :D


Tuesday, July 3, 2012

TimeOut KL Photoshoot


Hurrah, July is here! And with July comes this issue of TimeOut KL, in which I had the fun opportunity to be in a photoshoot, thanks to the adorable Emma. Emma asked me to picked out my own clothes for the shoot, and (naturally) it was one of those times when a woman looks into her (full) wardrobe and thinks "OMG I have nothing to wear!"

Women!  /rolls eyes at self

It was really fun to have my own handmade clothes (except the white top which I didn't make) in the magazine shoot. It was my first time being photographed in a studio (with the exception of my graduation photos, but please let's not go there), and all I can say about smizing is that it looks easier on TV than in real life, heheh.

Another thing that excited me was the strobe lighting in the studio. After returning from the photo shoot I bombarded Lobak with questions about the lighting equipment, and he gave me the lowdown on strobe lighting vs continuous lighting. Very interesting...

Here are some photos from the shoot.


Photos by Azhar of Fotomomo


Anyway, this month's issue of TimeOut also comes with the debut issue of TimeOut Style, which I absolutely adore! It's packed with crisp pictures that are balanced out rather proportionally with text. And the text is of substance without trying to be pretentious, so yay! Definitely will look out for the future issues.

This month is going to be crazy, as I juggle my music and sewing jobs. I've also been keeping busy testing out new designs for L.A.R.K and sourcing for better materials. It's going to be exciting! :D

Btw, I recently watched Mirror Mirror and was blown away by the costume design, so I started a Tumblr dedicated to the late great Eiko Ishioka. Hope you'll enjoy her work as much as I do, she is a true artist indeed.

Tuesday, June 5, 2012

The modified Ellen


I made me a new pair of pants, thanks to Burdastyle's Ellen! The fabric was from my mom's stash, and I finished it with a vintage button-- a gift from my mom's friend. I forgot to take a picture of the button, but here's one from my Instagram:


So cute, right? And the colors totally match the floral fabric! :D


I tapered the legs of the pattern so it has a skinnier look.


The crotch curve is pretty decent on this pattern! I eliminated the pockets in the original pattern as well, and will probably draft new pockets when I make these pants again.


I'm so happy with the way it turned out.. I've always wanted floral pants and now I can haz one. With some simple modifications, I think Ellen is a keeper ;-)