

Yeah, I was so happy I felt like hugging her to sleep!
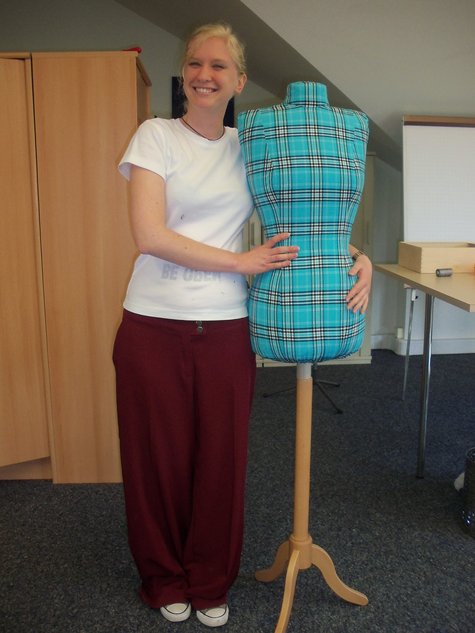
For my first ever project with Sha Nay Nay, I made a Lycra slip to wear under my dresses. The fabric is soft, so I can also wear it as a long tank top on its own.

Check out my boobies.

Just kidding, they're Sha Nay Nay's! Heh. Now stop checking out her cleavage! :P

This slip was fully draped on Sha Nay Nay, so no paper pattern pieces. I learned some pros and cons, which I'll get to below.

The edges were finished with small zig zag stitches, as I didn't want anything too bulky.

Here you can see one of Sha Nay Nay's adjustable dials, just like a cyborg eh?

Having a dress form has really helped me in my sewing adventures. It cuts down fitting time, and I'm able to create patterns from draping directly onto the form, like I did on the wedding dress. Here are some tips for getting your own dress form.
Tips on buying/making dress forms
If you sew for yourself and others...
1. Consider getting an adjustable dress form that falls within your measurements. Amazon sometimes has discounts-- while searching I found that the common size was M, and they were cheaper than the other sizes.
2. Check if the tailor form is pin-able. A pin-able form is needed for draping designs (some pin all the way into the body, and some pin halfway meaning you will have to angle the pin at a slant to push it in)
If you only sew for yourself...
1. Measure your body measurements (key areas: bust, waist, hips) and try to look for one closest to your size. It may be easier to buy a slightly smaller one and pad it up later to match your measurements, rather than buying a bigger one which might not help much with your fitting.
2. It won't be essential to have an adjustable dress form, so you get to save some money there :)
3. Like the above, check if the tailor form is pin-able.
4. Make your own! Here are a few ideas:

Shannon's duct tape dress form, made mostly on her own with the help of her adorable son. The thing I like about her version is that she filled the insides with spray foam.

Threads' mama got swag paper tape dress form

Sartorial DIY's amazing plaster bandages dress form. One word: WOAH!!
lazylinchen's sloper dress form filled with sawdust... another of my favorites!
Do you have a dress form, and if not would you be interested to make one on your own?


Love your slip!! And the color is so pretty. And happy to meet your Sha Nay Nay! :)
ReplyDeleteThank you Laurie! I'm glad I made this, my previous slip was so bulky and wonky :P
DeleteGreat when you get something new am like that when I just get a button hole chisel or a new sewing book. Yes I would love to make my own as my weight fluctuates.
ReplyDeleteHow did you get your edges so neat with just zigzag stitches. Am never happy when I do that even if I trim close it still doesn't look half as neat as yours.
DeleteI know what you mean about getting new sewing tools ;-) Thank you, I did a straight stay stitch less than 5mm from the edge, and then folded the edges in (using the staystitch as a guide), and zigzaged slowly so that only the left side of the zigzag stitch catches the fabric, and the right side doesn't catch any fabric at all. I tried doing it without the staystitch and it was very hard to control since this fabric was stretchy, so for now that's the only way I know how to do it..
DeleteThe slip is adorable and nice to meet your new dress form!I really want to buy one myself!
ReplyDeleteThank you! I think you would have a lot of fun with one too! :)
Delete